Blog

What is the Official Capital One 2019 Data Breach Site?

Capital One’s 2019 data breach involving “about 140,000 Social Security numbers” is an evolving news story. Capital One has created a section of their official website to provide consumers with information, but it isn’t easy to find.

Here is Capital One’s official “site” for this data breach (it’s two pages on their main site): https://www.capitalone.com/facts2019/

Like we saw with Equifax’s 2017 breach, expect a large amount of scam and phishing sites to pop up imitating Capital One’s official site. Do not enter your personal information into any site you cannot verify is secure and operated by Capital One!

How can I tell if my personal information was compromised?

Capital One has stated they will contact impacted customers directly. It is unclear if they will make available a tool to check if your SSN was leaked, like Equifax did in 2017. More information is available on their official FAQ page.


Capital One and its logo are trademarks of Capital One, and are used here for informational / instructional purposes. I am not affiliated with Capital One and this article has not been endorsed or approved by Capital One.

Secure Your Online Banking in 5 Steps

So, you’ve opened a new bank account, credit card, or investment account. Almost every financial institution under the sun now offers online banking, and each has its own enrollment process. No matter the specifics, make sure to do these 5 things when signing up and getting your new account ready.

  1. Choose a secure password and a unique username. Many online banking platforms mandate strong passwords, but they can’t detect if you have reused the password elsewhere. Never reuse a password. This opens you up to credential stuffing attacks. Come up with a complex password, with upper and lowercase, special characters, and save it in your password manager.
  2. Enable two-factor verification. Your options will vary here, but almost every service supports text message, phone, or OATH-TOTP based two-factor verification. This provides an extra layer of security that can stop an attacker from utilizing a compromised password. Prefer app-based methods (Google Authenticator, Authy, etc) over telephony-based as intercepting SMS or calls is a real risk and surprisingly easy to do.
  3. Set up account alerts. Check your options for receiving alerts. Most accounts have these disabled by default, except for very important alerts, to avoid overwhelming consumers. Review your account’s alert options, and consider enabling text message alerting if supported.
  4. Turn on paperless statements and review them regularly. Signing up for eStatements is not only environmentally friendly, but it also reduces the amount of sensitive information you have lying around in hard-copy form. The convenience afforded will make it easier to regularly review and catch a fraudulent transaction in time, or dispute an error.
  5. Call Customer Service and request a pin or password be required to your account for support calls or tickets. Social engineering attacks are becoming more widespread. It’s surprisingly easy to impersonate you, using publicly available information, and persuade Customer Service to grant unauthorized access. This isn’t a surefire fix as it depends on Customer Service actually honoring and confirming the pin every time, but it can cut down the risk a lot.

Each of these steps incrementally improves your account security and together will greatly reduce the risk of compromise. Change your passwords regularly and use a password manager for everything.

What is googledocs.g-cloud.pro? May 2017 Google Apps Worm

Example of Google Docs/Gmail Phishing Email
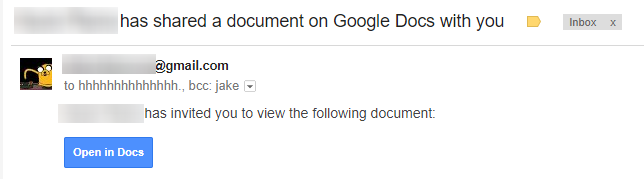
screenshot courtesy of /u/JakeSteam

How do I revoke access to this worm?

There is an emerging Reddit thread about this issue that may contain more up-to-date information as the situation develops: https://www.reddit.com/r/google/comments/692cr4/new_google_docs_phishing_scam_almost_undetectable/

Per Reddit user JakeSteam, take the following steps:

  1. Revoke access to “Google Docs” immediately. The real one doesn’t need access.
  2. Try and see if your account has sent any spam emails, and send a followup email linking to this post / with your own advice if so.
  3. Inform whoever sent you the email about the spam emails, and that their account is compromised.

What data has been compromised?

If you authorized the fake “Google Docs” application, an unknown attacker may have access to the following:

  • Ability to manage your contacts (read/write)
  • Ability to read, send, delete, and manage your email

In theory, this means it is possible everyone affected has had their entire inbox scraped for passwords or other credentials. While this cannot be ruled out since the application gained full access to Gmail, I personally believe this to be unlikely. This was a fast-moving worm and some Gmail users have many gigabytes of mail stored. To scrape all of this mail would greatly slow down the spread of this worm, since the malicious server would be spending time exfiltrating data, not propagating.

Just because it is unlikely all your mail has been stolen doesn’t mean it hasn’t been. I would encourage rekeying any systems with credentials stored in your mailbox.

What is https://googledocs.g-cloud.pro/g.php and how did I authorize it?

You may have received an email like the following – a near-perfect imitation of the real Google Docs sharing notification. If you clicked on “Open in Docs” and proceeded to authenticate, your Gmail account may be compromised.

This phishing email uses OAuth and a convincing bait email to get access to your emails and address book, then send more phishing on your behalf.

The initial phishing email was sent to the address “[email protected]” and would Bcc the target. It included a link like this:

hxxps://accounts.google.com/o/oauth2/auth?client_id=346348828325-vlpb3e70lp89pd823qrcb9jfsmu556t8.apps.googleusercontent.com&scope=https%3A%2F%2Fmail.google.com%2F+https%3A%2F%2Fwww.googleapis.com%2Fauth%2Fcontacts&immediate=false&include_granted_scopes=true&response_type=token&redirect_uri=https%3A%2F%2Fgoogledocs.g-cloud.pro%2Fg.php&customparam=customparam

This authorizes 346348828325-vlpb3e70lp89pd823qrcb9jfsmu556t8.apps.googleusercontent.com (since pulled offline) to access the OAuth scopes https://mail.google.com and https://www.googleapis.com/auth/contacts. The victim is then redirected to https://googledocs.g-cloud.pro/g.php. This script uses the newly-gained access to send more phishing emails to all your contacts.

What’s going on at that @mailinator.com account?

Malicious Mailinator Inbox

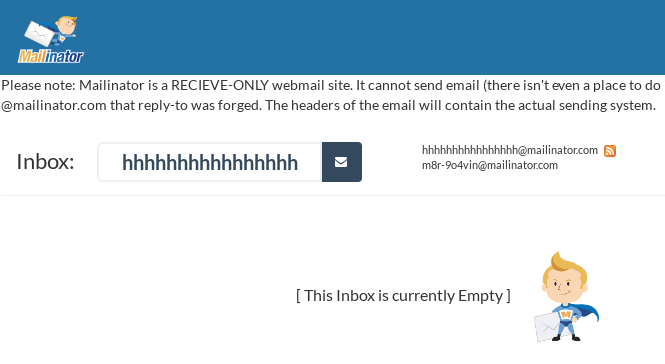
As of 4:18PM EST it looks like Mailinator has intervened and disabled this inbox. While this is a bummer for researchers like myself, it is a relief they have taken the time to prevent further disclosure of emails affected by this phishing attack.

It is worth noting they’ve added the following disclosure to their site, likely in response to the attacker’s use of their service.

Please note: Mailinator is a RECIEVE-ONLY webmail site. It cannot send email (there isn’t even a place to do it on the site). If you received an email “from” @mailinator.com that reply-to was forged. The headers of the email will contain the actual sending system.

Additional domains the attack utilized

The following domains were also utilized in this attack:

googledocs[.]docscloud.download
googledocs[.]docscloud.info
googledocs[.]docscloud.win
googledocs[.]g-cloud.pro
googledocs[.]g-cloud.win
googledocs[.]g-docs.pro
googledocs[.]g-docs.win
googledocs[.]gdocs.download
googledocs[.]gdocs.pro
googledocs[.]gdocs.win

source: https://www.cyberscoop.com/gmail-phishing-attack-oauth/

Disable 3DES SSL Ciphers in Apache or nginx

There exists a long list of SSL/TLS ciphers that should be avoided for a proper HTTPS implementation. You can find a near-ideal config for high-security TLS 1.0/1.1/1.2 at cipherli.st. This will get you 90%+ of the way towards a well-configured setup.

However, neither the cipher suites specified at cipherli.st nor the Qualys SSL Test flags CBC-mode 3DES ciphers. These ciphers may be vulnerable to CVE-2016-2183, aka the “Sweet32” attack.

OpenVAS has only recently started flagging these ciphers. Blocking them is quite simple and will only affect the oldest of web browsers, which are inherently insecure without upgrading anyways. Triple DES is a relatively old cipher that has several vulnerabilities published in the last 18 years. Although it used to be a government standard for encryption, it should no longer be used.

Disabling all 3DES ciphers in nginx is easy. You can find where your ciphers are defined by running the following command (assuming your config files are in /etc/nginx/):

grep -r "ssl_ciphers" /etc/nginx/

Once you’ve found the file in question, make sure your cipher list contains ‘!3DES’. For example, as of November 2nd, 2016, this is the cipher list I have chosen to use.

ssl_ciphers 'ECDHE-RSA-AES128-GCM-SHA256:ECDHE-ECDSA-AES128-GCM-SHA256:ECDHE-RSA-AES256-GCM-SHA384:ECDHE-ECDSA-AES256-GCM-SHA384:DHE-RSA-AES128-GCM-SHA256:DHE-DSS-AES128-GCM-SHA256:kEDH+AESGCM:ECDHE-RSA-AES128-SHA256:ECDHE-ECDSA-AES128-SHA256:ECDHE-RSA-AES128-SHA:ECDHE-ECDSA-AES128-SHA:ECDHE-RSA-AES256-SHA384:ECDHE-ECDSA-AES256-SHA384:ECDHE-RSA-AES256-SHA:ECDHE-ECDSA-AES256-SHA:DHE-RSA-AES128-SHA256:DHE-RSA-AES128-SHA:DHE-DSS-AES128-SHA256:DHE-RSA-AES256-SHA256:DHE-DSS-AES256-SHA:DHE-RSA-AES256-SHA:AES128-GCM-SHA256:AES256-GCM-SHA384:AES128-SHA256:AES256-SHA256:AES128-SHA:AES256-SHA:AES:CAMELLIA:DES-CBC3-SHA:!aNULL:!eNULL:!EXPORT:!DES:!RC4:!MD5:!PSK:!aECDH:!EDH-DSS-DES-CBC3-SHA:!EDH-RSA-DES-CBC3-SHA:!KRB5-DES-CBC3-SHA:!3DES';

Disabling 3DES ciphers in Apache is about as easy too. Find where your ciphers are defined with the following command (again, presuming your Apache config is in /etc/httpd/):

grep -r "SSLCipherSuite" /etc/httpd/

Once you’ve found the file containing your cipher suite, make sure it contains ‘!3DES’. As of today, this is a suitable list:

SSLCipherSuite EECDH+AESGCM:EDH+AESGCM:AES256+EECDH:AES256+EDH:ECDHE-RSA-AES128-GCM-SHA384:ECDHE-RSA-AES128-GCM-SHA256:ECDHE-RSA-AES128-GCM-SHA128:DHE-RSA-AES128-GCM-SHA384:DHE-RSA-AES128-GCM-SHA256:DHE-RSA-AES128-GCM-SHA128:ECDHE-RSA-AES128-SHA384:ECDHE-RSA-AES128-SHA128:ECDHE-RSA-AES128-SHA:ECDHE-RSA-AES128-SHA:DHE-RSA-AES128-SHA128:DHE-RSA-AES128-SHA128:DHE-RSA-AES128-SHA:DHE-RSA-AES128-SHA:ECDHE-RSA-DES-CBC3-SHA:EDH-RSA-DES-CBC3-SHA:AES128-GCM-SHA384:AES128-GCM-SHA128:AES128-SHA128:AES128-SHA128:AES128-SHA:AES128-SHA:DES-CBC3-SHA:HIGH:!aNULL:!eNULL:!EXPORT:!DES:!MD5:!PSK:!RC4:!3DES

For both Apache and nginx, after changing your cipher suite, test your config (httpd -t or nginx -t) and restart the service in question.

3D Printed Wall-Mount Toothbrush Holder

There are many items in the average bathroom that could be improved upon. In this instance, I discovered my ceramic toothbrush holder to be pooling water internally and was quite hard to clean.3d_printed_toothbrush_holder_render

This is probably a classic instance of over-engineering, but over-engineering is what I do best. I designed this plastic wall-mount toothbrush holder in SolidWorks and printed it on Laboratory B‘s SeeMeCNC Rostock MAX in white ABS. With no enclosed spaces to pool water in, this design promises to be much more sanitary and quite easy to clean every surface. Hand resurfacing with acetone proved effective to seal the infill from any water penetration. In addition, the chemical treatment left the surface smooth and shiny.

I will upload the STL file for this print soon! WordPress typically restricts STL uploads so I will have to adjust that setting first.

3D Printed Toothbrush Holder

Improving Mail Deliverability in WordPress with Amazon SES

Out of the box, WordPress doesn’t always do a great job of sending mail. This isn’t necessarily its fault – web server and DNS configurations matter a lot when it comes to sending high deliverability messages. Ensuring deliverability is especially important when it comes to eCommerce sites, but even a single missed lead capture form can cost your company a great sum in lost potential revenue. It’s an embarrassment when your legitimate mail gets in customers spam box.

One of the easiest and most reliable ways to improve your deliverability is by implementing a third-party mail sending service like Amazon SES. Although AWS in general can be quite confusing, once you’re set up, it just works. Since it’s a pay-as-you-go service, you will only be billed for messages you actually send. Most low-volume sites will cost less than a dollar per month.

So here’s how to set it up!

  1. Sign up for AWS if you do not have an account already.
  2. Set up a billing method to pay for the services you use.
  3. Navigate to the SES configuration panel, click on Domains, and press Verify a New Domain.
  4. Enter the domain you’d like to send mail from, and check Generate DKIM Settings. Press Verify This Domain to start the verification process.
  5. You will be shown a TXT record to set to verify your domain. You will also be shown three CNAME records to set up DKIM. Add all four of these records to your DNS configuration, and Amazon will periodically check to see when they’re all set up.
  6. You will also need to set up SPF at this time. If you already have an SPF record, add include:amazonses.com somewhere before the end (~all or -all). If you do not have an SPF record, you can add the following to only permit sending from SES: v=spf1 include:amazonses.com -all. There is more official information about SPF available here.
  7. Generate SMTP credentials in SES by clicking on the domain, and then selecting SMTP Settings on the left. Press Create SMTP Credentials and you will be walked through creating a special IAM user to only access Amazon SES for this domain. When you are shown your Access Key ID and Secret Key, save these as they make up your SMTP login.
  8. Open a support ticket using this form to request Production access to SES. Until Amazon removes the default limitation on your account you will not be able to send mail outside of your domain. Make sure not to force SMTP mail on WordPress until you’re notified you’re out of the sandbox, or messages will not be sent.
  9. On your WordPress site, install and activate WP-Mail-SMTP which will permit you to route WordPress mail over SMTP. Under Options -> Email, select Send all WordPress emails via SMTP. For the SMTP host, enter the region-specific hostname displayed on the SMTP Settings page in SES. You can use port 25, 465, or 587 in case one is blocked on your server. Select Use TLS Encryption, and enter your Access Key ID as your username and the Secret as your password. You are also encouraged to force a from address that matches the domain you are sending from.
  10. Use the Send a Test Message functionality to try out your new SES implementation. If the debug output starts with bool(true) – your message was sent successfully!

No Sound in Fedora 23 Linux with ALC892 (Intel HDA)

tl;dr: show me the fix plz thx

Did your sound also just quit working in Fedora 23 or other Linux distribution? You are not alone. My sound issues seemed to line up with an unclean shutdown performed courtesy of my foot. First I thought I corrupted my Gnome profile, but looking in the Sound settings panel, I saw no output devices.

No output devices? My computer audio was working this morning. I’ve never heard of an integrated sound card getting damaged in an abrupt shutdown either – it just doesn’t make sense. So it had to be a Linux oddity.

Out of sheer curiosity, I tried uninstalling PulseAudio. I should still be able to get sound with just ALSA, yet this step had no effect.

Specifically, I have a Gigabyte GA-78LMT-USB3 motherboard with a quad-core 4.2 GHz AMD CPU, 16GB of RAM, and a Crucial SSD. If you also have the GA-78LMT-USB3 motherboard you likely have the same sound chipset as me – the Realtek ALC892 / ALC887. My first search now that I knew the chipset turned up this 2014 forum post. However, most of that is just bug reporting and trying several things that did not work.

It wasn’t until I found this Ask Fedora question that I got my solution. Simply creating a .conf file in /etc/modprobe.d with the following contents was sufficient to restore my audio functionality completely:

options snd_hda_intel single_cmd=1
options snd_hda_intel probe_mask=1

An effective one-liner to perform this fix would be as follows.

echo "options snd_hda_intel single_cmd=1\noptions snd_hda_intel probe_mask=1" > sudo tee /etc/modprobe.d/intel_hda_fix.conf

Cheers!

Update: an earlier version of this post referenced “snd-hda-intel” instead of “snd_hda_intel.” Underscores are the appropriate character here and dashes will not work.

We’re Officially HSTS Preloaded!

So, I checked today, and after submission to the Chrome HSTS Preloading List, and we are indeed HSTS preloaded. This list is also used for Safari, Firefox, and IE11/Edge. This means that the most recent browsers will never send an HTTP request to this site, even when visiting for the first time. This greatly reduces the opportunity to perform an unencrypted HTTP Man-in-the-Middle attack against this site.

aaronsilber.me in HSTS preload list

Install authbind on CentOS 7 x86_64: Download the RPM

Here’s the RPM for authbind 2.1.1: https://s3.amazonaws.com/aaronsilber/public/authbind-2.1.1-0.1.x86_64.rpm

Need a refresher? Most systems should permit installation directly from the URL, so try this:

sudo rpm -Uvh https://s3.amazonaws.com/aaronsilber/public/authbind-2.1.1-0.1.x86_64.rpm

This RPM was built using the authbind-centos-rpm project. There is not currently an easy-to-find repo for prebuilt RPMs for authbind. It doesn’t look like authbind is changing anytime soon (last updated a year or two ago) but if it does, note you’ll have to either compile from source yourself or find a new RPM to update it – your package manager will not handle it.

Enjoy, and stay safe while not running your scripts as root!

Fixing 403 Forbidden When Setting up CentOS 7.X / nginx 1.6.x / PHP 7.X / Enforcing SELinux

I know you’re all here for the command, so here it is:
sudo chcon -v -R --type=httpd_sys_content_t /var/www/


It’s no surprise one of the most common SELinux related search terms is “how to disable SELinux.” For the majority of users, the complexities involved in Mandatory Access Control aren’t worth sorting through and they opt to disable it in favor of the classic Linux Discretionary Access Control.

When used correctly, however, SELinux can do a lot for stopping the spread of an attack, or the privileges gained with a successful exploit.

What I’m doing in this oneliner is relatively simple: change the security context recursively for everything in /var/www to “httpd_sys_content_t”. I was able to find the correct security context by running ls -Z /etc/share/nginx/html – nginx already set these correctly when it installed, since this is the default web server content. If your distribution’s package uses a different SELinux context, just use that instead.

Fix your SELinux configuration instead of throwing the baby out with the bathwater and shutting it off!